
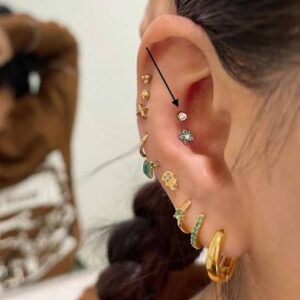
If you are treating your ears as a curated collection, the difference between a “good” ear and an “exceptional” one often comes down to the technical details of your routine.
Here are the advanced tips to ensure your curation stays healthy, balanced, and aesthetically stunning for years to come.
1. The “Anatomical Fit” Strategy
The biggest mistake people make is buying jewelry that looks good on someone else but doesn’t fit their own anatomy.
The “Lying Flat” Test: Before buying a large cluster or a statement piece for your flat or conch, check if your anatomy allows it to sit flush. If the jewelry has “wings” or large prongs, make sure they won’t dig into the natural folds of your ear.
The Angle Matters: If you plan on wearing hoops in the future, tell your piercer now. A piercing intended for a stud should be angled differently than one intended for a hoop. A professional piercer can “map” your ear to ensure future versatility.
2. Advanced Aftercare Hacks
You know the basics (saline + don’t touch), but these nuances will take your healing to the next level:
The “Sweat and Rinse” Rule: If you are an active person, sweat is your piercing’s worst enemy. It’s salty and full of bacteria. If you hit the gym, rinse your ears with clean water immediately afterward, then follow up with your saline spray.
The Hair Product Barrier: Be mindful of shampoo, conditioner, and hairspray. These chemicals are designed to coat hair, but they can easily irritate a healing piercing. When washing your hair, try to lean your head in a way that minimizes product runoff over your ears.
Don’t “Over-Clean”: It sounds counterintuitive, but cleaning a piercing too much (more than 2–3 times a day) can dry out the tissue and cause irritation. Let your body do the heavy lifting—your job is just to keep the area clear of debris.
3. The “Curation” Logic (How to Style Without Clutter)
If your ear starts looking “busy,” use these rules to regain harmony:
The 70/30 Balance: Aim for 70% of your piercings to be “subtle” (tiny studs or thin, plain hoops) and 30% to be your “statement” pieces (large clusters, dangling charms, or bold colors). This keeps the ear looking styled rather than cluttered.
Create “Negative Space”: Don’t be afraid to leave one area of your ear completely blank. This “empty” space acts as a visual break and makes your other piercings look more deliberate and high-end.
The “Golden Ratio” of Size: Try to vary the sizes of your jewelry. A large piece next to a tiny piece creates more visual interest than five pieces that are all the same size.
4. When to Know It’s Time for a Change
The “Downsize” Window: If your jewelry starts moving around easily or the post feels “long,” go to your piercer. Leaving a long post in for too long is the #1 cause of “migrated” or crooked piercings.
The Jewelry Audit: Every 3–6 months, check your jewelry to ensure the ends (the “tops”) are tight. If you have threadless jewelry, check the pins; if you have threaded jewelry, give it a quick clockwise twist to ensure nothing has come loose in your sleep.
Listen to the “Flare-Up”: If a healed piercing suddenly gets red or angry, look at your life, not just the jewelry. Have you been sleeping on that side? Did you get a haircut where your hair got snagged? Often, “mystery” flare-ups are just responses to mechanical trauma.